Installation
Quick Install (recommended)
- Please download the theme zip from your CodeBard account if you haven’t downloaded it already. You should have a zip file named ‘codebardthemeone.zip’.
- Go to your WordPress admin at your website, and go to “Appearance” menu from the left hand menu. You will see an “Add Theme” link at the top, as in below illustration.

Click this link to go to Theme add/upload page.
- Now you will notice an “Upload Theme” link at the top as illustrated below.
Click this link to display the theme upload utility.
-
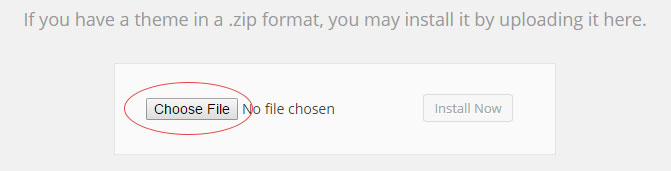
At this point, you should see the theme upload utility as illustrated below:

Click the “Choose File” button to be able to browse for the theme file you have downloaded earlier, and select the file when you locate it in your Downloads folder, or wherever you downloaded your theme file.
-
Click “Install Now” button after you selected your theme file.
Your browser will start uploading the theme file to your WordPress. This may take some time depending on the speed of your connection.
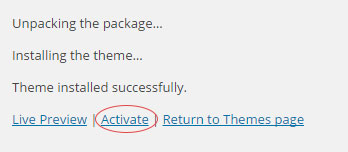
After the upload is complete, WordPress will automatically extract your theme and place it in correct location. You will see a screen as illustrated below:

Click the “Activate” link.
-
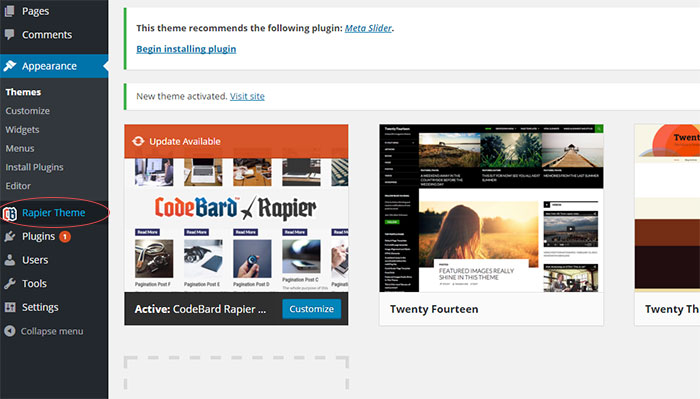
Your theme will be activated on your site. The default style selected will be the one which comes with theme installation file, “Avicenna”.
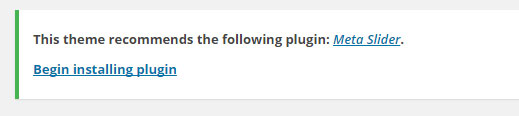
At this point you will see a plugin recommendation on your screen:

If you click “Begin Installing Plugin”, WordPress will automatically get and install the free ‘Meta Slider’ slider plugin for you. You can later use this plugin to create and use sliders if you need a slider plugin and do not have one.
This plugin is not necessary for your theme, and is only recommended for your convenience. You can click the “Dismiss this notice” option on the right hand side of the notification you see, in order to totally dismiss the recommendation for good.
-
Now your theme is installed and activated, and it is ready for use.
Manual Install through FTP

Click this link to go to Theme add/upload page.

Click this link to display the theme upload utility.
Click the “Choose File” button to be able to browse for the theme file you have downloaded earlier, and select the file when you locate it in your Downloads folder, or wherever you downloaded your theme file.
Your browser will start uploading the theme file to your WordPress. This may take some time depending on the speed of your connection.
After the upload is complete, WordPress will automatically extract your theme and place it in correct location. You will see a screen as illustrated below:
Click the “Activate” link.
At this point you will see a plugin recommendation on your screen:
If you click “Begin Installing Plugin”, WordPress will automatically get and install the free ‘Meta Slider’ slider plugin for you. You can later use this plugin to create and use sliders if you need a slider plugin and do not have one.
This plugin is not necessary for your theme, and is only recommended for your convenience. You can click the “Dismiss this notice” option on the right hand side of the notification you see, in order to totally dismiss the recommendation for good.
This method of install requires some technical knowledge and access to your web host’s FTP server.
- First make sure that you have the FTP details to connect to your web hosting account, and configure your FTP client.
- If you haven’t installed WordPress yet, you must first install WordPress. For that, visit instructions at WordPress.org. If you already have set up your WordPress site, this step is not necessary.
- Login to your hosting account via your FTP client, and navigate to wp-content/themes folder. You will see folder names of the already existing themes in your WordPress site

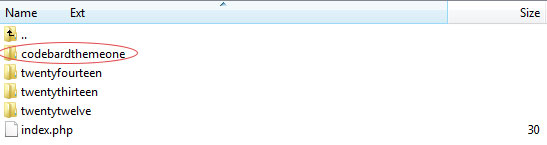
- On your computer, navigate to the folder you have downloaded the theme file (codebardthemeone.zip), and extract this zip file by using an archive utility. Make sure that all the extracted files are residing under a directory ‘codebardthemeone’ after extraction.
- Upload codebardthemeone folder with all the files inside, to wp-content/themes folder through your FTP client. USE ASCII or automatic setting to upload your files. Do not use Binary setting to upload files.
Upload may take some time depending on the speed of your connection.
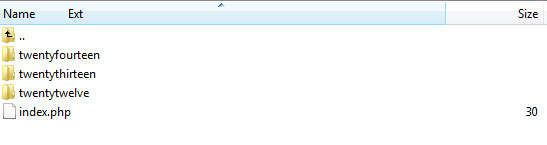
- At the end of the upload, you should be seeing a folder named ‘codebardthemeone’ in your themes folder at the FTP site as illustrated below.
This means that FTP installation is complete.
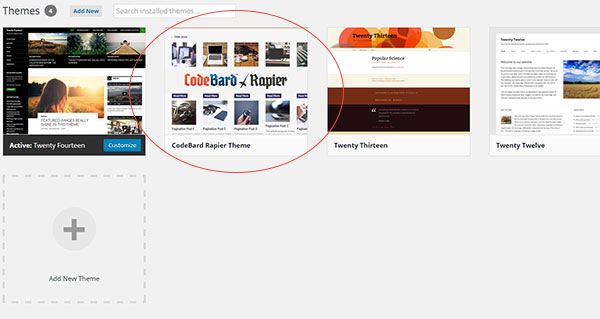
- Now, go to your WordPress admin at your website, and go to “Appearance” menu from the left hand menu. You will see a listing of your themes:

Hover over CodeBard Rapier Theme choice with your mouse. You will see “Activate” and “Live Preview” buttons. Click on “Activate” to activate CodeBard Rapier Theme for your site.
- At this point your theme is installed, activated and ready for use
Theme Settings
You can access your Theme’s settings via Theme Settings menu which you will find on your admin menu bar as illustrated below:
This will bring you to settings screen, where you can do easy configuration or in-depth modification of your theme:
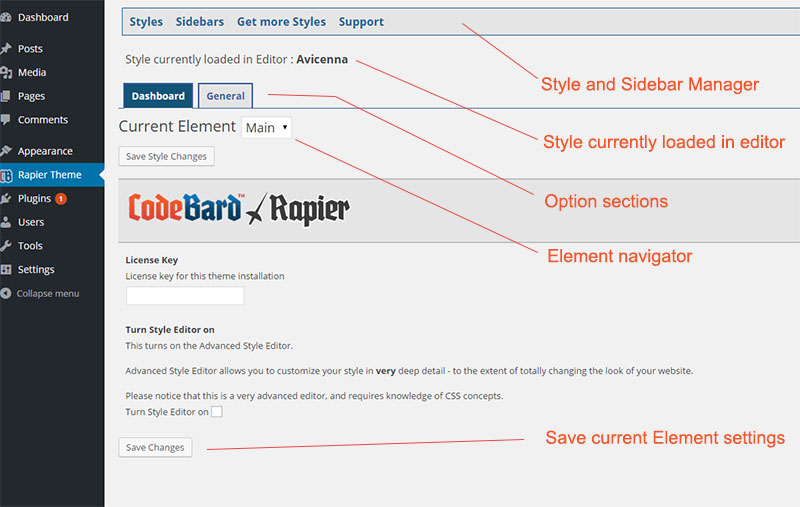
Style and Sidebar Menu allows you to manage your existing styles, load them, edit them, activate them and back them up. It also allows you to easily download new styles from CodeBard Style Server and use them. Initially there will be only the default style, “Avicenna”. You can download more styles via “Get more Styles” menu.
Style currently loaded in editor is displayed in the relevant section. The style you see is loaded in editor so you can modify its settings and looks here in admin. However to preview your changes you will need to use the Preview link under Styles link, and to activate those settings on the live site you will need to use the ‘Activate’ link which is under the Styles link in the above menu. This allows you extensively modify your style and test your changes before activating them on the site.
Option sections allow you to visit and change different features of your theme and do extensive modifications if you wish to do so. Normally you do not need to see or use more option sections than Dashboard and General. These sections will allow you to customize important elements of your site ranging from your Logo to slogan, and will allow you to include your analytics code. All option sections will only be displayed if you choose to turn on Style editor, which is not necessary and therefore turned on by default.
Element Navigator will allow you to navigate in between Elements in any given settings/option section. Its very useful if you choose to turn on Style Editor.
Save Changes button allows you to save the changes you made to the section/element you are currently viewing. This is necessary to do to save any modifications and settings to the particular style. Any change you make, will be made to the style which is displayed in ‘Style currently loaded in Editor’ notification above. No other style will be affected by your changes.
Setting up your theme
Dashboard
First thing to do is to save your license key you got while processing your download at CodeBard.com. Enter your license key to the license key box. In case you don’t know your license key, visit your CodeBard account and click on your download details to see your license. Saving your license is very important since it will enable you to automatically update your theme. It will also enable you to download styles from CodeBard Style Server.
In case you want to use Style Editor to extensively modify your styles, check ‘Turn Style Editor On’ box below. Notice that this will enable a utility for very advanced users who are proficient with HTML and CSS.
Click ‘Save Changes’ to save your license and your style editor preference. The theme will validate your license. You will be notified when your license is activated. If activation fails, a warning will appear. In that case, contact support from “Support” link in the above menu.
General
In this section, you can set up your logo, ad codes (if you are running any ads), and Advanced JS and CSS options. You can navigate elements of this section by using the Element Navigator as shown below.
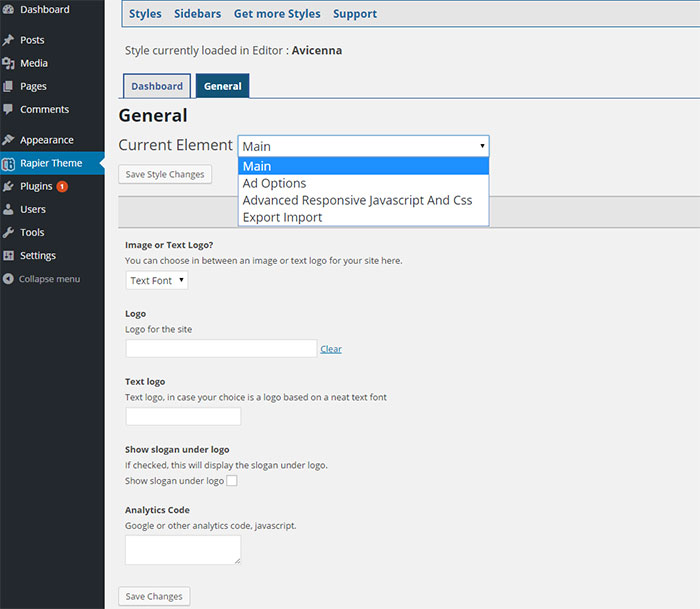
Image or Text Logo?: If you are going to use an image logo, you must set this setting to Image. Otherwise a text logo will be displayed. When you install your theme, the default text logo will be showing. When you set your image font or custom text for the logo for text font in this section, your selections will take priority.
Logo: if you are going to use an image logo, you can upload your logo by clicking this text box. WordPress media manager will open, and will let you upload and choose your logo. You must save afterwards to save your logo selection into db.
Text Logo: if you are going to use a text logo, type your text here. You must have logo choice set to ‘Text Font’ to use a text font.
Show slogan under logo: If you check this checkbox, the slogan you set in WordPress site settings will be shown under the logo. This may or may not look good depending on which style you are using.
Analytics Code: Here you can paste your Analytics code – Google or any other Analytics Code – JavaScript.
Ad options
Ad options section is self descriptive. Choose Ad Options element from Element Navigator, and fill your relevant ad code in locations provided, and arrange margins as you require.
Advanced JS and CSS Options
This section is rather advanced, and you should only use these options in case you want to speed up your site. The options are well described under the choices in this section.
Getting, saving and using New Styles
Top admin menu will allow you to get other styles from CodeBard Style Server, save and use them. You can have an infinite number of styles saved in your theme settings, and change your site’s style to any of them whenever you want.
When you click “Get more Styles”, your theme will connect to our Style Server and will get a list of available styles.
When you choose a style and click “Get and Save Style” button, the style will be retrieved from the style server and saved in your styles. But it won’t immediately go active.
To activate a style you have downloaded and use it on your website, go to “Styles” menu, choose the style you downloaded from the dropdown list, and then “Load Style for modifying options”.
This will load the style into the editor. A message saying that the style was loaded successfully will appear.
At this point, if you click “Activate Changes” link in the menu above, the style which you downloaded and now loaded will be activated on the front end of your website, and your website will be using the new style.
